There is nothing more expensive than custom gallery wraps!
Okay, there are more expensive things, but at least the price tag of a Mercedes is high for a reason.

Gallery wraps are basic things to manufacture. Seriously.
An image is printed on canvas. The canvas is stretched over a wood frame, and stapled in place. That's about it. Yet a nice gallery wrap for your living room can set you back $80+ bucks. Sometimes much more.
Lately I've been messing around with DIY wall decor. Not only does it kill time during the cold months, but it also saves me $$$, and finally gets some of my travel images off my hard drive.

*Before you ask, I do have photos of my family throughout my home, too. But I've always been hesitant to turn family photos into gallery wraps for a reason. I am a photographer, and I'd be making a new wrap for my kids and family every month; constantly wanting to update my walls. I find it is much more efficient to display family photos in frames. It's easier to switch them out frequently.
Preference, I suppose.
So Let's Get To Work!
Supplies:
- Prints
- Canvases in the same size as your prints (I suggest buying canvases first. Some irregular print sizes are harder to find in canvas form.)
- Mod Podge
- Large, flat paint brush (I own the Mod Podge brush and LOVE it)
- Small 1/2" paint brush
- Black Acyrilic Paint (or desired accent color)
- Crappy Old Bowl
- Crappy Old Towel
- Starbucks Gift Card (an old grocery rewards card works, too. No worries, there isn't a remaining balance on my gift card.)


I currently live in Germany, so the majority of my supplies were purchased here at local stores: Tedi & Nanu-Nana
I order my prints through a US company: Nations Photo Labs. I adore their metallic prints. They have the prettiest sheen to them, making the subject(s) in each photo really pop!
As for my Mod Podge and Mod Podge brush: Amazon. Where else?!
With my supplies, an episode of the Vampire Diaries streaming via Netflix, and coffee by my side, I got started.
First, I paint the edges of each canvas with my black acrylic paint and 1/2" brush. I purposely paint just above the edge (where the photo will be placed), just in case a photo print is slightly smaller than my canvas, although generally they are slightly larger. There's always that one in the bunch, though.
I do also hit the back side so that no white is seen while hanging.
You may wish to leave the canvas white, but I feel it makes it look unfinished.
Helpful Tip:
If you don't want to get paint all over your work space, I find that using a box as a 'work table' helps. It keeps the painted canvas from touching any surfaces while drying.


After the paint has completely dried (emphasis on completely), you are ready to affix your print!
This is where you will have to work fast. Mod Podge dries quickly, which is sometimes a good or bad thing, depending on. Once affixed, you have about 15 seconds to make slight adjustments if your image needs straightened.
Pour some Mod Podge into your crappy bowl.
Lay out your crappy towel, smoothing any huge bumps. It must be flat.

Now give the front of your canvas a good, even coating of the Mod Podge. Don't lay it on too thick, but you don't want it thin, either. Pay attention to the edges.
I didn't take a photo of this process because I had to work quickly! But it's pretty self explanatory.
Place your print on to the mod podge coated canvas. Give it a gentle smooth with your hand, and flip over on to your towel, so that the picture is facing down.
With your wallet card, smooth the backside of the canvas. I keep my card flat while doing this, and pay extra care to the edges UNDER the wood, smoothing it as well.
Do NOT press the wood frame. It will create an ugly marking on the front side of your print.
*Why the towel?
My metallic prints are very finicky, and will damage with the slightest scratch of a grain of sand. The towel helps provides a soft, non abrasive surface. And if the mod podge ruins it, at least it wasn't my rug or carpet. I'd recommend using an old towel to everyone, not just folks using a metallic print.

Almost done!
Let your photo sit face down for a few minutes, allowing the mod podge to dry.
Flip over and admire your handy work for a second while sipping coffee.

Looks good, no?!
You may notice that your photo is slightly larger than the canvas.
This used to BUG the hell out of me. But even the sharpest of exacto knives didn't help. My metallic prints are super thick. And cutting them to size only ruined the edges.
Now I leave them alone.
You can go ahead and trim up the edges if you prefer to using a sharp razor blade knife and a cutting board. But I've ruined enough prints that were already mounted to a canvas to not recommend this.
If anything, trim the photo prints before affixing them to the canvas. Before you do so, measure carefully!

The next step is the finish line, people!
Yay!
You can leave your floating print alone at this point, or you can give it a coat of Mod Podge to seal the deal.
Personally, I have always given it a coat of mod podge, but have learned that Mod Podge as it is is too thick a formula for the top coat of this project. For every 1/4 cup of Mod Podge, I add about a teaspoon or so of water and mix it well before applying.
*If you are using the same brush/bowl of mod podge that you used to apply the print, double check your bowl of podge and your brush to make sure there is NO black paint to be found. Otherwise you may end up with a nice black streak across your image during the next step. This is why I put emphasis on making sure the accent paint dried completely before affixing the print.
When you are ready, make long strokes with your wide paint brush on to your print. Work quickly. Again, this stuff dries fast.
I recommend brushing it on in the direction of how it will hang. If it's a horizontal photo, make your strokes horizontal. If vertical, you get the point.
Your masterpiece may look scary and milky before the Mod Podge sets, but they always do! It will dry clear, I promise.
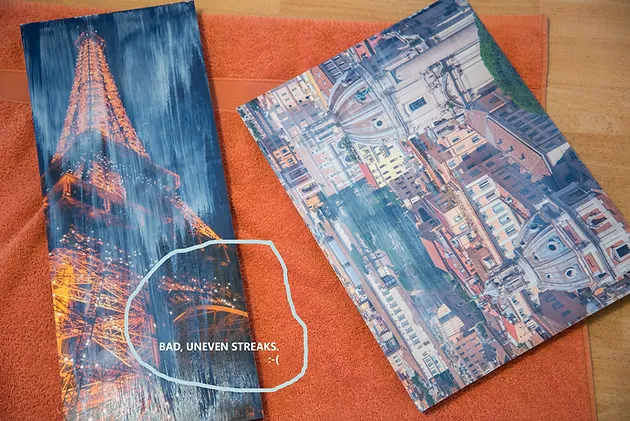
My Rome photo above (right) has good, even strokes. But Le Eiffel?
Aghhhh! Bad.
If you are quick enough, you can attempt to correct streaky Mod Podge with water and your brush (painting on the water over the Mod Podge), but I couldn't save my Eiffel print.
*Pisser de la copie!!! Ah, merde.*
Honestly, I think I am going to ditch my top coat the next time around. It doesn't do my metallic prints much justice as a finished product, but for a regular matte or glossy print, it may be a different outcome.
*Helpful Knowledge:
I find that darker images highlight mod podge brushstrokes, and not in a good way.
Once your work is completely dry, it is time to hang!
I'm still figuring out where to place my new floating images, so don't judge the layout on the wall! I have a few more to do...
But for only a few bucks and some patience, I have some of my favorite travel photos hanging on my walls, reminding me of wonderful places we have visited during warmer times!
Winter is here.

That's all folks. I will update y'all when I have hung some without a top coat and give ya feedback.
Until then, happy mod podging!
***UPDATE*** MARCH, 3rd
I recently made a few of these without the top coat of Mod Podge, and well...not so nice.

If you simply glance at the photo above, you KNOW which ones are without the top coat.
And if you aren't wearing glasses, I'll tell you:
The photos with an angry glare/sheen.
From certain angles, it doesn't look bad, but it does bug the hell out of me!

Yep, just as I thought, leaving the top coat off doesn't make for a polished finished product. And I did take one down a few days later and gave it that much needed top coat, but it was for nothing. Whomp whomp. By then, the photos newly mounted to the canvases were too bubbled, and far too gone.
My advice, do the top coat shortly after affixing the photo to the canvas!
Comments
Post a Comment